I have always been interested in native Americans, when I was small and we played cowboys and Indians I always wanted to be the Indian, tipi's were made from old sheets, blankets with broom shanks and long sticks, for poles. Well time passes as it does, and here I am retiring in 2007 with a small cash payment from my pension, so we (my good lady and I) decide to order a tipi from Reese tipi's in the U.S.A. We decided on the 15' 9"as being of a size that we could manage, and large enough to live in for 5-6 weeks at a time.
The poles were a problem I ended up buying whole trees of lodge pole pine and thinning them down myself, a long job, and what starts off as a good straight tree standing is not the same as the bent and twisted tree you have on the saw horse !
Here we are setting up for the first time on the west coast of Scotland, this took some time as we had to keep looking at the instructions, it is a three pole tipi, that is three poles make up the basic frame and the rest of the poles are added to them, then all lashed together, before putting on the cover, that is tied to the lift pole, lifted up to the rear of the poles then unwrapped around the poles, then laced up at the front. Here we have the tipi cover on, before the poles are moved out and the pegs are put in.

Poles moved out, and cover pegged down,and the smoke flap poles put in, smoke flaps are used when a fire is used in the tipi and are adjusted according to the wind direction, to let the smoke be drawn out.
The next job is to put the liner in, this is tied to two ropes, one just above the liner height and one in the middle, this was quite a tricky for the first time, as it is key to comfortable tipi living, keeping the tipi warm and draft proof, and cool when the weather is hot, the bottom was pulled out and stones put on to weigh it down, you can just see them in the pic.
We were so pleased with the tipi, we had made some mistakes putting it up, but we thought it was great, inside it is so roomy and gives a sense of peace that is almost imposable to describe, plus what would we have done if we did not like it, after all reading about something, and actually having it are two different things.

A view looking up inside at the poles.

All setup and time for a cuppa, I painted the liner before we left home, I looked at lots of liner designs on the net, and came up with this design, dont know if it is Sioux, but it is very pleasing.
This is my good lady, next one is me.
It was quite a good year for weather, but we did have one storm that came in, one of the local boatmen came along one afternoon and warned us there was a storm coming in, so we rushed about tying everything down, closing the smoke flaps, moving the car to the windward side to give a little protection.
We watched the storm coming towards us across sea then it hit not to bad at first, but as the night wore on it got worse and worse torrents of rain wind at gale force 8 gusting to 9, the poles were bending in two to three feet in the gusts, with me braced up trying to hold onto them, at 2-30 I gave up could hardly
move my arms and my shoulders were on fire, so went to bed, next morning tipi still there, cool!
Our friends who were near us in caravans had a lot of damage to there awnings, and were amazed that we were still standing.
One other problem we did have was drips of water, it is recommended that two sticks are placed between the liner ropes and the pole, to allow the water running down the inside of the pole to pass straight passed the liner ropes, but with the wind shaking the tipi so much, the sticks just dropped out, before long the ropes were soaked and dripping in all over the place, this was a problem I would have to solve. More to follow.
The rest of our time went very well, we did however need a hand taking the tipi down as it was a very windy day, the cover is as big as a large sail on a yacht, but with help of our friends we managed just fine.
Our wonderful guard dog Diana, vigilante at the
door, and crashed out after an exhausting spell of
guard duty.
will add more to this post soon, thanks for looking.
888888888888888888888888888888888888888
Well here we are at 2008. have designed something that I hope will solve the problem of the sticks dropping out, and the water dripping onto the liner, here is the design.
I was first thinking about two sticks joined with
a piece of wire, drilling a hole in the top of each,
but thought this would be a lot of trouble for
something that would not be that strong, so came
up with this idea, made of wood, and strong enough so it would not split. Elm was the choice
as it is hard to split, and dose not mind getting wet.
All the work was done with a band saw a round and half round wood rasp, first job to cut out the blocks two for each pole and a few spares, then set the fence on the saw to cut along the side profile, then if you

feel confident and keeping your fingers well back from the work, (make a small jig with the block of 2x2 /1.1/2x1.1/2 with a cut out in it) cut out the back, it does not have to be very good as you will finish off with the rasp,next cut out the front legs, working carefully rough shape the curve at the top, again to be finished with the rasp, do all the operations on all of the pieces not each one separately, a bit like an assembly line, otherwise it will take you forever.
here are the pegs roughed out just needing a quick sand.
and some of the finished pegs, you will see I have left them fairly rough so they get a good grip on the liner rope, just sand the edges of the legs so as not to wear on the rope.
please feel free to copy this design, as long as you don't do it as a commercial enterprise, in which case
I want a cut!
Only the top pegs were decorated, as the middle ones are not seen.
They work a treat the only ones that moved at all were the two on the door poles.
It was a busy winter I made the pegs,a possible bag to hang on the top liner rope, and painted the tipi bag, liner bag, and the ground sheet bag, also enough wooden tent pegs from Elm.
Tipi bag
groundsheet bag
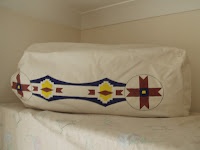 |
Liner bag
|
Well this year was very kind to us with the weather some rain
but that's Scotland,
Midges are always a problem, but we never get them in the tipi,
must be something to do with the air being carried up and out
of the top from the tipi, another plus.
A nice shot looking across the bay.
If you are interested in tipis a great book is
The Indian Tipi by
Reginald & Gladys Laubin
includes History, Construction, Use, and much much more, available from a web site starting with A.


